DIY Solar install on 2001 American Dream
While I am not an electrical engineer, I do enjoy tinkering with all types of hands on tasks. I had previously built a couple of solar panels from parts I bought on ebay and while they did not provide the power I had hoped for, I was really intrigued by the promise of “FREE” electricity.
In November of 2013 my wife, Lois, and I traded in our little pop-up camper and bought a used 2001 class A diesel pusher motorhome. We started full-time living in the American Dream in March of 2014. One of my biggest surprises about the full-timers lifestyle was the nightly cost to park the coach in RV parks.
At an average of $35.00 per night I decided we needed an alternative, but we were not willing to just park in a relative’s yard and run a 15amp extension cord to the house. We are not the type to live “off grid” or boondock for long periods of time, but we do enjoy the State and Federal parks where electricity may or may not be available. Also, I did a little math and discovered that if we could park without hook-ups for 3 nights a week, we could save around $100.00 per week or $5000.00 per year. That would be enough to more than pay for a moderate DIY solar system for my coach.
Before starting this project, I read completely, Jack Mayer’s Site, Solarbob’s Blog and all the forums I could find. I highly recommend that you do the same. This education will equip you to install your own system or give you the confidence to purchase the parts wisely or to hire the work done and not get taken by “solar expert” salesmen.
Phase I: Determine your needs
A ) Purchase and install a Trimetric 2030RV battery monitor in accordance with the instructions.
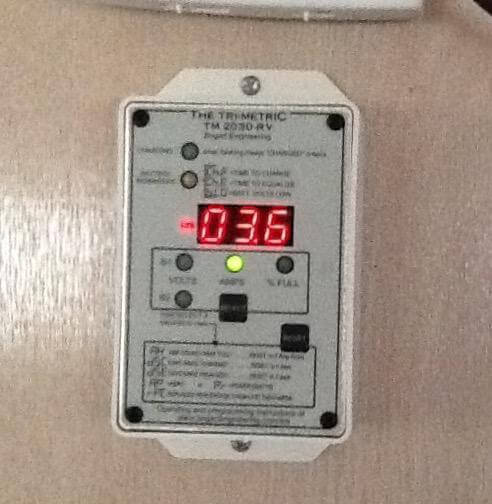
B ) With shore power disconnected and all lights and appliances off, determine your phantom load. (mine is 0.5amps) these are the little things that can not be turned off, like the CO/Propane detector, monitor and gauge lights, refer control box, etc.
C ) Determine amp draw of each 12 volt light and appliance by turning them on by themselves and noting the draw on the monitor.
D ) Turn on the inverter and note the draw just from the inverter itself (mine is 5 amps)
E ) Measure and note the draw of each 120 volt appliance running on inverter power. Keep in mind that there are things that will not run on the inverter such as the A/C units and water heater then there are things that you may not want to run on the inverter such as the refrigerator even though it will run for a while but you have alternatives.
F ) Using any of the online solar usage calculators, determine your maximum usage in Amp/Hr per day. This will help size your: a) battery bank [2-3 times your daily usage] and b) the approximate wattage of your solar array [array in watts = battery bank in AH]. My usage averaged 200- 250 AH depending on degree of conservation we used. The 250 is pretty much using as we please. Refrigerator and water heater on propane while dry camping.
Our bank is 440 AH (4×6 volt golf cart batteries in series/parallel) at 220 AH each. This gives us appx 220 AH per day without discharging below 50%. I plan to upgrade to 6 x T-105s in the near future, for total of 675AH and 335 usable.
Based on current and proposed battery capacity we selected an array of 2 x 255 watt Kyocera panels.
Phase II Shop around and order equipment and supplies ( I found Northern Arizona Wind and Sun to have the best prices on the equipment that I wanted.)
Phase III
A ) Install Controller as close to battery bank as possible but not in battery compartment. (mine is mounted on the common wall of the adjacent compartment.)
B ) Measure and cut cables (2 AWG or larger) to reach battery connections. Remember to leave slack for slide out trays and for maintenance access. Connect cables to controller as directed in installation manual.
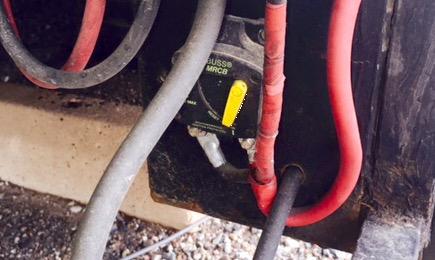
C ) Install fused disconnect (80amp) in + (positive) cable between controller and battery. (assure that disconnect is set to off)
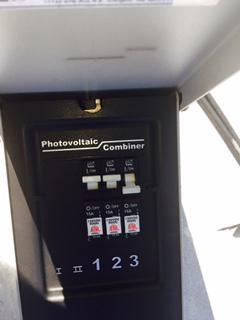
D ) Prepare roof combiner box by removing knock-outs, drill access hole in roof (or access one of the vents), pull wire (6 AWG) from combiner to controller. Because I used circuit breaker type fuses that can be turned on and off in the combiner box, I did not add a second disconnect above the controller as I had originally intended. Attach wires to controller and combiner. (assure that circuit breakers are open or off).
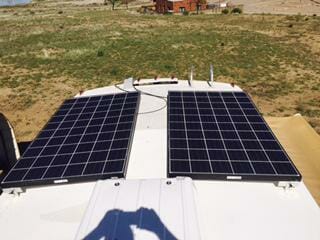
E ) Install panels to roof as desired [“Z” brackets, rail mounts, or tilt mounts]. Keep panels covered with cardboard taped to the face to prevent shock hazard as panels are active in sunlight.
F ) Attach MC4 cables (10AWG) to panel outputs and other end to circuit breakers in the combiner box. Secure all connections to specified torque.
G ) Secure cables to roof with lap sealant
H ) Remove cardboard covering panels.
I ) Attach battery cables from controller to bateries; positive first then negative.
J ) Turn on disconnect between batteries and controller to energize controller. make sure that controller is active (via front panel or flashing LED’s)
K ) Turn on circuit breakers from solar panel to controller at combiner.
L ) enjoy FREE Power
We have made a couple of trips since the install and one in particular was noteworthy. I was dry-camping in Wyoming in early June for 4 days and 3 nights While the weather was quite stormy, I was forced to run the generator only one day when it was raining for almost all the daylight hours. The other days I ran 2 fantastic vents, lights until 11:00pm, TV for a couple of hours and microwave to warm up dinner and was able to have 100% charge on the batteries by 2:30 or 3:00pm the next day. There was no need for the A/C and the fridge and water heater were on propane. Each morning at daylight my battery bank level was between 68 and 75%. Granted I was alone on this trip and Lois really likes to watch more TV than I do, so the results would have probably been a little different had she been there.
As I have stated, we have very reasonable expectations of what solar can do for us, but are extremely satisfied with our results. My system ended up costing me just shy of $2000.00 with me doing all the work myself. I sized my system for 3 panels and used the maximum size wire that my controlled allowed. I will add the other panel if I can find the space on the roof or if the panels become more efficient and I can use a smaller panel.
For those who are thinking of adding solar to your coach, I would encourage you to create a solar rally so you can get a group of like-minded people together and assist each other with the installation. I would be happy to attend as a done-it-myself advisor.
Tom Dansby
to********@***il.com
Full-timer
2001 American Dream
For an approach to solar power that is PORTABLE and ON A BUDGET – see THIS POST
1 thought on “Solar Power – guest post by Tom Dansby”