I’m a full timer. That is… I live in my camper, a fifth wheel throughout the year, day in and day out. I chose the camper I live in because it is WELL built and one of the FEW true 4 season trailers. Not only do I live in mine all year, but I spend about 1/2 the year in COLD weather – specifically the northern Rocky Mountains. Yes, I know I’m crazy, but I’m a ski instructor and I love skiing all winter and that’s hard to find in South Florida or even southern Arizona!
When I conducted my search for the best camper for my needs, quality of construction and 4 season capability were my two top priorities. As with the purchase of any camper, there were aspects of it I found to be “less than optimal” for my lifestyle and needs. I knew however that “down the road”, I would be able to modify the campers interior to meet my needs.
I had two floor plans in mind – rear dining or rear living. Both offer a great view from the rear bay windows. It is essentially a 270 degree view and allows LOTS of light into the trailer. (Even in the winter, I use bubble wrap on the windows inside so I can allow natural light in.)
I opted for a rear living fifth wheel trailer with “dual opposing slides” – this provides the maximum living space when camped. There is also a bedroom slide and the bed is oriented “east-west” which allows for a full width closet in the front cap.
Identify the custom changes you want to make
While all these features were to my liking, as I mentioned earlier it did not mean that the campers interior was 100% functional for me and my needs. Specifically, there were two areas I wanted to customize. One was minor – a cabinet that needed slide out drawers instead of shelves. I made that modification within months of purchasing the trailer and by doing so, it made storage of pantry items more functional (my video illustrates this customization.) The second customization was to be more significant as it involved the removal of the dining table and replacing it with a desk / breakfast nook that also offered more storage for my “stuff.”
I have prepared both a video and taken some photos to show what I had done. I’m doing this simply to show you how you can take charge of your campers interior and modify it – in some cases quite drastically – to make it work for YOU.
With both modifications, I commissioned private cabinet workers and while I’d be glad to promote them, frankly the one who did the drawers does not deserve my praise (his work was marginal and required further adjustments after the initial install) and the cabinet maker of my major project does not want the promotion as he has more than enough work to keep himself busy! As I reflect upon the QUALITY of what he created I fully understand why he has more work than he can handle!
I’m going to direct the majority of my remaining comments to the major project.
Building Custom Furniture for your Camper… Factors to consider –
The first reality I had to accept is regardless of how great my custom furniture would be for me and my needs, it would likely make the resale of my camper more difficult, and any dealer would likely balk at taking it in on trade (never a great idea anyway) as it is no longer “factory spec.”
In essence, while the furniture I had built works great for me, it required removing the dining table (and 2 of the 4 chairs.) This change may not work for the next owner! In my case, I was fine with this reality. I then had to find out if my customization was even possible…
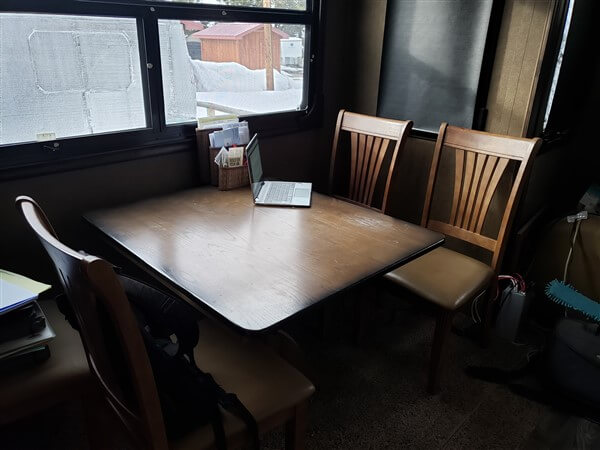
Before installing the custom furniture, the original dining table had to be removed. Fortunately, it was able to come apart into pieces small enough to be easily removed from the camper.
- Will it fit? (Consider ALL aspects including the ability to use existing doors and drawers)
- Will it weigh too much for the slideout?
- Can it be safely mounted/secured inside the camper?
To answer these questions, I started by creating an “architects drawing” of the proposed piece. I had to insure all dimensions “worked.” In my situation, that meant limiting the width to insure cabinet doors already existing in the camper could still be opened; I also had to insure that the eating area could remain at the same height as the original dining table; and finally whether the cabinet depth (including protrusions created by the handles on the cabinet and drawer doors) still allowed for the two remaining chairs to comfortably sit on the carpeted area of the slide-out without being “off level.”
In other words, I tried to insure that all factors that needed to be considered were thought out before any materials were purchased or any construction began.
Need more “RV Stuff“? Check out what I personally use and recommend HERE.
Custom Furniture in a RV – Further Considerations…
Once I determined that the dimensions I had in mind would work from the perspectives mentioned, I checked in with the manufacturer of the trailer to insure the following:
- Will the slide-out that houses the dining table handle the increased weight of the new furniture? (In my case – yes)
- Can the furniture be secured and what limits exist to securing it? (In my case – the wall had no studs, only 1.5″ high density foam (in a luan “sandwich”. Screws CAN be used to affix the furniture to the wall, but their length is necessarily limited. The same is true of screws into the floor of the slide-out.)
- If drawers and doors are to be utilized – will they close securely as this is necessary inside a moving camper.
And one more consideration with the furniture maker…
- Will the furniture fit through the entry door after construction? (I had mine built in 3 pieces and it was then assembled inside the camper. It’s installation is now permanent and will never be removed from the camper without significant difficulty.)
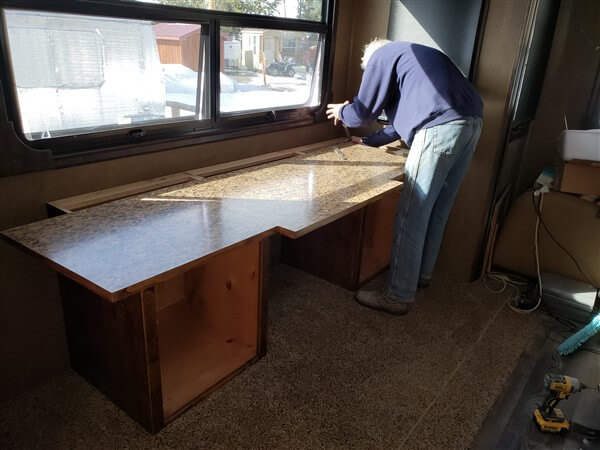
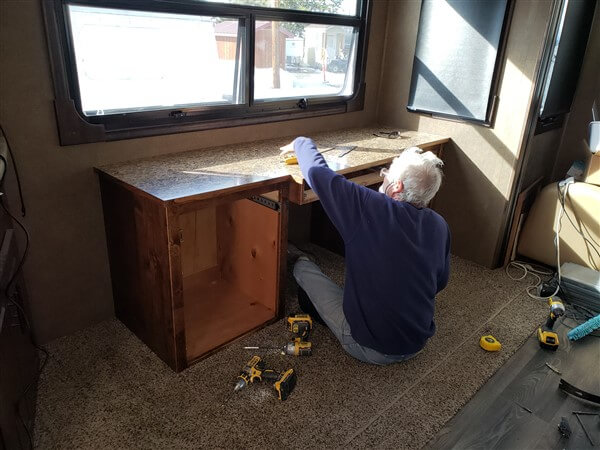
With this knowledge, the fellow who built the furniture proceeded to build and then install it. The job was completed with minimal difficulty – actually inside of a couple of hours after he finished all his construction within his shop.
Custom RV furniture – Am I satisfied?
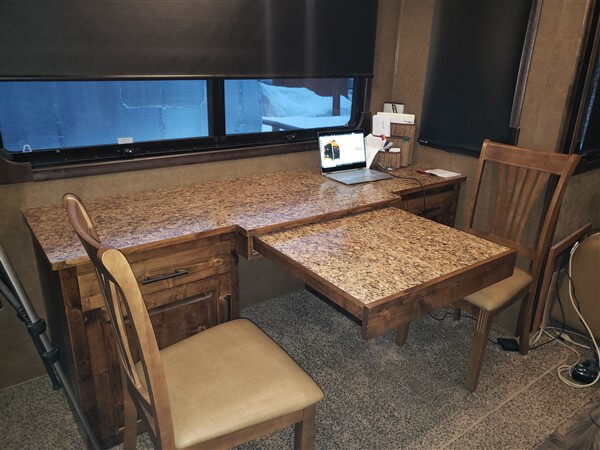
Here’s the finished product(s) –
You bet I’m satisfied! The piece I had built fits my needs exactly as I anticipated – I have increased my available storage, maintained sufficient eating area, created a functional work space, and in the area under the breakfast nook, I plan to add an electric stove type fireplace!
Do YOU have a custom project planned for your Camper or RV? Tips to consider…
If so, I’d love to hear about it. My three pieces of advice in closing are…
- Commit all plans to paper and double (triple) check all measurements.
- Get multiple quotes for the work you’d like done. In my case there was over a $1000. difference between some quotes.
- When searching for the right person to do the work, ask around and don’t rely exclusively upon Google searches. In my case it was a fellow who was living in the same RV park I stayed in this past winter.
Hey thanks for visiting! Please DO check out my other posts – along with my suggested RV Accessories page (lots of good stuff at great prices!) and lastly, don’t miss my recent heart attack story.
PS – I’m back on the road… here’s my latest adventure in Tough Creek Campground.
Like the content? Want to be advised of updates when they’re posted? Please sign up for my newsletter using the form below…
I always enjoy your posts and videos. Thanks for doing them. LK
thanks so much for your kind thoughts and words. al