My original video about Spending a Winter in the Rocky Mountains was made about 8 months ago, just as I was coming out of the coldest part of my first winter in the mountains. Now with one season “under my belt”, I find myself better prepared for what IS coming!
In fact, in my few days here in Steamboat in early November, already we have had in excess of a foot of snow (here in the valley!) and temperatures have dipped as low as 5F! As often happens in November, the weather has rebounded, it feels like nearly 60 in the sun today – but – one has to always remember where you are and the fact that the weather can “turn on a dime.”
Preparation for Winter 2013 in an RV (5th Wheel)
While my winter preparation is not yet complete, I do have a fairly complete game plan. As you study the photos below, you’ll note some changes from my previous year – particularly in how I set up my water hose and sewer hose (photos are not yet complete on this strategy, but I’m about to describe it.) Before I begin, if you wish to see my thoughts and feelings about returning to Steamboat and my experiences in the first few days of November this year, you can read my article on my alansills.com site.
Ok, now to the technical stuff…
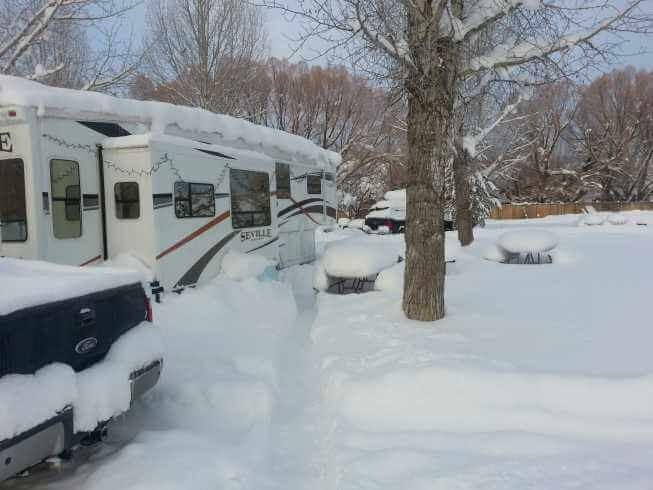
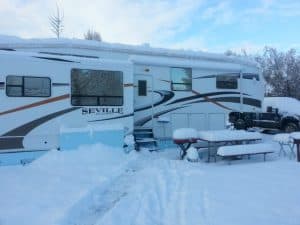
Last winter I ran heat tape (coil) around the water hose and then “wrapped” it with styrofoam tubes that enclosed the hose and the wrap. This year, upon advice from the local Ace Hardware guy, I purchased thin fiberglass insulation (see the pics – and I have a pic of the stuff I purchased) and wrapped the hose (after wrapping the heat tape first.) You can see progress in my “project” by studying the photos. I then took the entire “mess” and wrapped it in plastic bags (which to the best of my “skill” were taped to be water-tight.) So far, this strategy has paid off, though I have not “fully tested” it yet. On the nights where the temperature sank below 10F, I kept the water trickling inside all night to insure it would not freeze. More recently, the nights have been closer to 20F, I “dared” to close the water faucets inside and at sunrise I still had flowing water! So far, so good!
As you study the photos, note there is a small stretch along the hose (approx. 25 ft) that the heat tape did not reach (I used two 15 ft coils). For that small stretch, I applied thicker “traditional” fiberglass insulation – and figure it will get buried in the snow soon enough! Note also the end of the heat tape where the plug is must be exposed as that has a thermostat in it and the heat tape shuts off when temperatures exceed freezing. The heat tape is wrapped around the hose right up to the water connection inside the bay door of my RV. I will see if that is sufficient to keep things liquid inside that bay door as we settle into real winter. If not, I have a drop light I can place in there. Note also the RV is oriented so all this is on the southside of the RV and despite how cold it gets all winter, it will get sun during the day! Last winter, the most critical time period was the month of January. By the first week of February, the days were long enough and the sun high enough to begin to thaw any freezing that occurred overnight. (Remember – Steamboat is a fairly sunny region.
This may not work as well in areas of the Pacific NW where clouds dominate all winter.) The area near the campground spigot has a copper heating element mounted on the spigot to keep the water flowing out of the spigot, and a giant trashbag filled with insulation. Note that my hose has wrap and heat tape up into that area (under the trash bag and inside the campgrounds fiberglass insulation.) Now as to the sewer line – the big change this year is to run the line inside the blueboard insulation. Only about six inches of sewer line is exposed to the outside world this way and I will close the gap around the blueboard where it comes out. Further, I plan to lay 1 stretch of 15 ft. heat tape under the sewer line (which is resting on a camco support from the RV to the sewer connection.) Lastly, I will be adding two lamps underneath – one near the sewer line (not too close!) to keep that area somewhat warmer, and a 2nd one under the levers that release grey and black water (last winter they froze as the chains were too cold).
I believe a well applied heat lamp under there will alleviate the need to run heat in my RV to uncomfortably warm levels (resulting in the burning of tons of propane!) Last winter I ran heat to 67 in January to heat the underbelly – an expensive choice that burned through 100 gallons of propane in 3 weeks! (That was the fastest I burned through a tank of propane all winter, typically I got 5 – 6 weeks out of a tank.) So… thats it for now, check the photos, and I welcome your thoughts and feedback via the comments section below.
Alan I am going to Beaver Creek Col. this winter, I would like to talk with you and pick your brain, if you can give me a phone number I can call I would appreciate the help, thank you Bobby
Hi Bobby,
My time will free up significantly in October, can we talk then? You can reach me at 561 676 1205. If you have questions about winter preparation in a RV, I have an extensive section on that topic here – https://rvacrossamerica.net/category/winter_in_an_rv/ Also, if I recall, the nearest RV park to Beaver Creek is about 30 minutes from the ski area.
Informative info! I have a couple suggestions that worked for my daughter for 2.5 years. Invest in a heated water hose, they aren’t cheap but work well. Cost is around 75 dollars! Then wrap with heat tape and insulation and gorilla tape where the hose connects to facet. Cover with a bucket to prevent water damage. They make a cap that attaches to house and faucet and works well for r.v. too, cost a couple bucks. Don’t let water run all night, can make a mess if drains freeze. Dump grey and black water then close again. Be sure to also insulate all the sewer dump hose etc too. We installed a small wood stove in her trailer and her propane cost dropped back to summer usage. The heaters in trailers are not made to run 24/7 and hers always went out once each winter. Also oil filled heaters are great too and use little energy! She lived in North Idaho and was cold/blowing/windy. Skirt your trailer, it does make a tremendous difference!
Thanks for your feedback; you’ll find more recent videos on rvAcrossAmerica.net that do talk about heated hoses. As to a wood stove, not a fan of that approach for several reasons – lost space, cutting hole in RV to accommodate, possible CO, dirt and mess.
Thank you for this informative video! I am coming up to Steamboat to be with my family there. I just purchased a work n play toy hauler to live in. I am wondering what happened to your refrig in the cold there. Do I need to disconnect mine? I have a small 12 volt coleman cooler I can use. I am a retired RN and coming home to Steamboat. Thank you for your help.
The fridge recovered and functioned properly once temperatures warmed. If you plan to spend the winter, try to get a site where your fridge faces south; and if/when it does fail, have a back up approach for refrigeration until spring comes! Oh, and congrats on your new towable! If you need a quote on an extended service contract (highly recommended), let me know.
WE have just gotten a 5th wheel camper4 season. We are going to be staying in it this winter 2014. I am looking on line to get ready for this winter with all the ideas that I see on line. Seen with water hose to warp hose with alumina foal before heat tape and putting in pipe insulation. Putting a roof over and one side closed. Mine is a heartland camper with the frig venting like yours , wondering what had to be done with your frig? Thinking about putting a electrical heater with a thermostat to keep bell warm and water, should help keep up stairs warmer .Would also like to know about the internet business you are doing to help you do what you are doing . Have a lot of questions and suggestions if you are willing to do .
Thank you,
Kevin Warfel
717-649-0999
Kevin,
I will call you in the next few days and we can talk. I will call in the evening (mountain time – somewhere between 6pm – 9pm)
Al